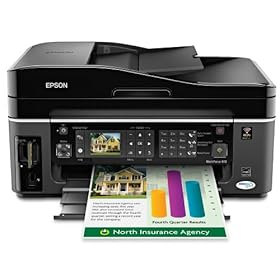
Epson WorkForce 610 Color Inkjet All-In-One Printer

This remarkable product manages to print documents up to two-times faster than leading color inkjet alternatives from competitive companies...

Activate Account Administrator di Windows 7 dan Vista : > "Run as administrator"...

HOW TO COPE VIRUS SHORTCUT 1234 RUNMIT

The characteristics of affected Virus 1234 Shortcut: 1. Shortcut Virus 1234 Runmit WATERMARK.EXE this will make the existing file in two places, namely:...

HOW TO SOLVE ERROR C000 ON CANON PIXMA MX870

How to solve error C000 on Canon Pixma MX870 Solution 1: Switch off the printer Disconnect the power cable Open door: ....

SPESIFIKASI TOSHIBA SATELLITE L645-1147XB

Spesifikasi Laptop Toshiba Satellite L645-1147XB O/S: Microsoft Windows 7 Home Premium Processor: Intel® Core™ i5-480M Processor (2.67 GHz, Cache 3 MB). Chipset: Intel HM55. Memory: 2 GB DDR3 SODIMM PC-8500, Max. Memory 8 GB (2 DIMMs) Graphics Engine: ATI Mobility Radeon HD 5470 512 MB...

Friday, February 25, 2011

"unable to clean 35" message error on Brother MFC 6490CW


Solution:


- Machine off

- Switch on the machine while holding down the "Menu" button,  until all the leds are flashing on/off: it's the "maintenance" mode.

- Press 80

- Press the "Mono start" button several times until you see "purge: xxxx"

- Press "2783" in order to reset the purge counter. You will see: "purge:0000"

- Press the "Stop" button.

- Press "99" to exit the maintenance mode.


Thursday, February 24, 2011

How to fix error 0XD0620230 on HP printers

Solution 1:

  • Turn on the printer.

  • Uninstall the ink cartridges.

  • Unplug the power cable from your printer without turning off .

  • Press the # and 6 at the same time you turn the printer off.

  • Plug the power cable back in and don't release the buttons yet until the small screen on the printer becomes blank or off.

  • Then release after.

  • Change the settings and choose the language.

  • Reinstall the ink cartridges.

  • Press the setup button. and its ready to go.


Solution 2:

  • Held down the # and the 3 and reset the unit. 

  • It's done

or

  • Turn your printer on, remove the power cable at the back of your printer while the printer is on.

  • Press and hold the # key and 3 key on the keypad, plug back the power cable without releasing those buttons, until you can see the Welcome screen or Inproper shut down.

  • Press OK to continue.


Solution 3:
Power off printer, then press and hold buttons while powering on, if it doesnn't reset, then unplug it and press and hold buttons while plugging it in, please tell us if the machine even tries to reset.


# and 3 Partial Reset


# and 6 Semi-Full Reset


# and 9 Full Reset


A Full Reset will clear any stored information in the printer, speed dials, etc, so always start with a partial reset and work your way up.


Solution 4:

  • Change the power of terhe printer


Tuesday, February 22, 2011

Fixing error E004 on canon IR1600


Solution:


Wiring

Is the connection of the connector (CN8) on the power supply PCB and the connector (J103) on the DC controller PCB and the wiring to the fixing assembly normal?

NO : Correct the connection and wiring.


Fixing assembly

Try replacing the fixing assembly.


Power supply PCB, DC controller PCB

Try repacking the power supply PCB. Is the fault corrected?

YES : End.

NO : Replace the DC controller PCB.


Error

With the power switch ON, clear E000 through E004; then, turn off and then on the power switch.


Friday, February 18, 2011

How to reset waste ink pad on Canon Pixma MP210

Error 5b00 means the waste ink counter is full, you need to reset it.


Solution:


Step 1: Download PCM Service tool.


Step 2: Enter in service mode in order to used the re setter:

  • Turn off the printer without pulling the power cords.

  • Hold down Resume button and press Power button

  • Keep holding down Power button and let Resume button go

  • Then Press Resume button 5 times then let both buttons go

  • The Alternate Blinking error is gone, the printer is in Service Mode state

Step 3:

  • Extract the PCM servive tool resetter and then double click "servicetool.exe"

  • Click Reload Button and you will get a new USB port.

  • Load some papers in your printer and press the "Main" Button, wait until it shows "error 001" then press OK.

  • Then press "EEPROM" button and the printer will print some text, after that click OK

  • Then power off the printer (sometimes you have to press twice the power button to turn off) and turn on again.


Tuesday, February 15, 2011

Error 0x61011beb on HP Officejet and Photosmart printers


Solution 1:

  • With the printer power on, disconnect the USB cable from the computer.

  • Remove the ink cartridges

  • Unplug the power cord. Wait for at least 1 minute. Plug the unit back in (press the power button if necessary)

  • Wait for the "Insert Cartridges" message. Reinstall the cartridges

    Close the product doors

  • If you receive a recalibration message, allow the printer to complete this task

  • Reconnect the USB cable

  • Try your print job again


Solution 2:

  • Plug it directly into the wall, rather than into a UPS.

  • Verify that the unit is switched on. Disconnect the USB/Ethernet cable from the All-in-One and also disconnect power cable from All-in-One and also from wall outlet.

  • Wait 30 seconds.

  • Plug in the power cable to All-in-One and also to wall outlet.

  • Check for the functionality.


Solution 3:

  • Unplug the power cable from printer when the printer is powered on and wait for 20 seconds.

  • Then, press and hold # and 6 while plugging in the power cord.

  • Continue holding until it displays Semi Full Reset message in the front panel of the All-in-One


Monday, February 14, 2011

How to reset waste ink pad on Brother DCP 770CW


How to reset waste ink pad on Brother DCP 770CW

Solution for "Error 46 Unable to Clean":


  • Enter machine maintenance mode. FAX models with numerical keypads: Press the Menu/Set, *, 2, 8, 6 and 4 keys within two seconds. (if you fail to complete the correct key sequence within two seconds, press the Stop key to try again).

    Other (non-FAX) models: Press the Menu/Set and Black Start keys. Next press the “up arrow” key four times to enter the maintenance mode).

  • Press the 8 then 0 keys in the initial stage of the maintenance mode to call up the machine’s log information list (function code 80).

  • Press the Black Start key several times to scroll through the log information list to reach the purge counter. The purge counter is the 25th item in the list.

  • Press the 2, 7, 8, and 3 keys in this order to reset the purge count to zero.

  • Press the Stop/Exit key to return to the initial stage of the maintenance mode.

  • Press the 9 key twice to return to the standby state.


Tuesday, February 8, 2011

INFO EPSON T13

Why the Epson Stylus™ T13?
Epson Stylus™ T13 is your perfect and customised desktop printing partner.

Water, smudge and fade resistant prints with Epson DURABrite™ Ultra Ink
  • Epson DURABrite™ Ultra Ink, an all-purpose ink for everyday printing, delivers vibrant prints that last. Superior printing quality is now possible with this revolutionary smudge and water resistant ink.


Save more with Epson INKdividual™ Cartridges
  • Enjoy greater savings with Epson cost effective INKdivdual™ cartridges. You can now maximise usage of your ink cartridges when you replace only the empty cartridge.


Superior print speed for tight schedules

Monday, February 7, 2011

How to reset waste ink pad on Canon Pixma MP520

How to reset waste ink pad on Canon Pixma MP520

Solution for error code 5B00:


  1. Switch the printer OFF

  2. Press buttons 1 + 2 + 3 and 4 (simultaneously using four fingers). See picture bellow

  3. Keep pressing this four buttons for 10 seconds

  4. Release the On/Off button (number 4) (Keeping pressing the others)

  5. After a few seconds (when the printer go ON) you can release buttons 1, 2, 3


    How to clean the printhead on Epson AcuLaser C1100, CX11N and CX21N

    How to clean the printhead on Epson AcuLaser C1100, CX11N and CX21N

    Procedure to clean the print head:

    1. Remove the cleaner cover on the right side of the printer.  Then, open Cover A


    2. Fully extend the blue lever on the right inside the printer.

    3. Fully extend the blue cleaner, and move it slowly in and out five times.

    4. Wipe off any loose toner on the blue cleaner.


      Ensure that the cleaner is moved out until it stops and then pushed back in. Otherwise the printer may not be cleaned effectively.


    5. Push back the blue lever inside the printer.

    6. Close Cover A, then the cleaner cover.


    Related Posts Plugin for WordPress, Blogger...